Posts

Showing posts from 2020

NEVER-ENDING CARD - Cutting guide116906214_10224279717885801_2552137383900158251_n.jpg
Image
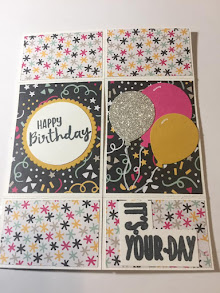
Never-ending Card cutting guide Cutting Directions:  Card Base: Thick whisper white card stock  2 pieces 4 1/4” x 5-1/2” Score one piece on landscape side at 1 3/8” at each end and cut in half along the horizontal (cutting across the score lines) Score second piece on portrait side at 1 1/16” at each end and cut in half horizontally (cutting across the score lines)  Coordinating Designer series papers of choice SIDE 1: 2 each 2 5/8” x 1 7/8” 4 each 1 1/4" x 1 7/8" SIDE 2: 2 each  2 5/8” x 1 7/8” 4 each  1 1/4” x 1 7/8" Side 3 2 each 2 5/8" X 1 7/8"  4 each 2 5/8" X 7/8" Side 4 2 each 2 5/8” x 1 7/8” 4 each 2 5/8” x 7/8” Supplies: Thick Whisper white card stock #140272 Memento ink pad #132708 Variety of Designer series papers that coordinate  FOR ASSEMBLY INSTRUCTIONS WATCH THE VIDEO TUTORIAL ON THE “KREATING WITH SANDRA FACEBOOK GROUP PAGE — UNIT #5
Image
                                                    Krafty Kreations with Sandra September 2020 Gift Card tutorial   Directions:  • Card Base: Misty Moonlight  card stock 8-1/2” x 5-1/2”. Score and fold at 4-1/4”. • Layer #2: Whisper white   5-1/4” x 4”.  Glue to card base.  • Layer #3: Misty Moonlight  In-color designer series paper 3 1/2” x 3 1/2”   Glue to whisper white layer, towards the bottom of the card, leaving an even border on three sides.  • Layer #4: Glue 3/4” x 3 1/2” strip of Misty Moonlight In-Color DSP to whisper white layer that measures 7/8” 3 1/2”.   Glue that combo strip vertically onto the 3 1/2” square of DSP.  It’s supposed to look like a ribbon!  Use a different pattern than the square. • Layer #5:  Layer #4: Glue 3/4” x 3 1/2” strip of Misty Moonlight In-Color DSP to whisper white layer that measures 7/8” 3 1/2”.  Glue that combo strip Horizontally onto the 3 1/2” square of DSP.  It’s supposed to look like the cross-ribbon!  Layer
Image
 Simple card design Yesterday I posted a video on my YouTube Channel about creating simple cards with 4" x 6" pieces Designer Series paper (DSP) I demonstrated 5 cards.  Here are the details. Card #1 SUPPLIES:  Card base - Card stock cut at 8 1/2" x 5 1/3", scored at 4 1/4"  Whisper white card stock for inside panel  4" x 5 1/4" DSP - 4" x 6"  scrap of whisper white card stock for stamping and punching Stamp set of your choice (I used Peaceful Moments #151595 ) Punch of your choice to fit sentiments (I used Story Label #150076) Paper trimmer (with scoring tool) Bone folder Stampin dimensionals Glue Optional -- embellishments like rhinestones, gems, enamel dots, etc. You choose any design and coordinating card stock. 1. Fold and burnish card base with bone folder.  This card made in "portrait mode" 2. Cut the DSP to 5 1/4" on the 6" side 3. Adhere the 4" x 5 1/4" piece of DSP to front of the card, leaving an eve
Image
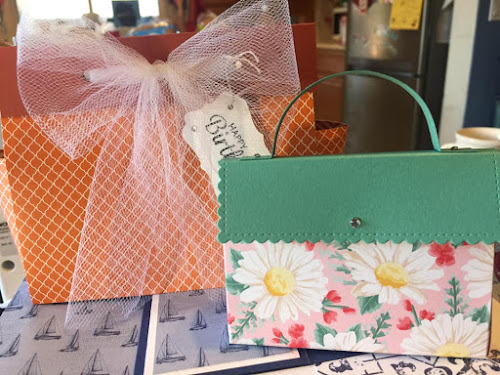
 Week #9 projects were two purses. The orange purse is made with a 12 x 12" pieces of designer series paper.  It is scored and folded.  There is no cutting involved.  To watch the tutorial, please join the Facebook group called "Kreating with Sandra" Scoring is at 5" and 7"  on one side.  Turn the paper 90 degrees and score at 3" and 9" The folding is tricky, so you have to watch the video. The pink and green purse is made with two pieces of 6 x 6 Designer Series Paper (DSP) Cut off 1 1/2" off the bottom of each sheet. Score both pieces at 1 1/2 and 5 1/2 along the 6" side Turn 90 degrees and score at 1 1/2"   Do the same to both sheets. The purse closure is a piece of card stock that measures  3" x 4", scored at 1 5/16  at each end in portrait mode (on the short side) The handle is 3/8" x 4 3/4". Score at 1/2" at each end. Cut the two pieces that you cut off from the bottom at 4". These will be used at the
  Join me on the Facebook Group called "Kreating with Sandra" every Wednesday at 2 pm (Pacific time) for a fun free class.  Each week we create a new project.  It could be a card, a gift card holder, and treat holder or something else.... it's different every week. I post the supplies needed on Saturday of the previous week.  I encourage you to use your own stash of materials, but would be happy to be your Stampin Up demonstrator if you don't already have one. My online store can be found at  https://sandratauler.stampinup.net Just click on "SHOP NOW"