Posts

Showing posts from January, 2022
Image
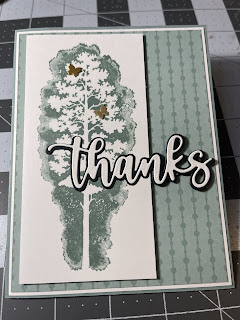
  Eden's Garden         Eden's Garden Stamp set         Eden dies Card 1               Card base - Sahara Sand card stock 5 1/2" x 8 1/2"    Scored at 4 1/4"               Layer 1     -     Evening Evergreen               Layer 2     -     Soft Succulent 3 1/4" x 4 1/4", emboss with Tasteful textiles folder               Layer 3    -      Ever Eden DSP 2' x 4"  Use Tailored tag punch to create banner end               Layer 4    -      Basic white  2 1/2" x 3 1/2"                Layer 5      -      4" x 5 1/4"  (inside panel)               Assembly:               1.  Adhere Layer 1 to front center of card vertically.               2.  Adhere embossed Layer 2 to front center horizontally               3.  Punch banner end at bottom of DSP (Layer 3) and adhere to front center vertically, about 1/4"                     down from the top fold.               4.  Stamp your sentiment on Basic white layer horizontally with Eve

Amazing Silhouettes

Image
Card #1 Card base - Soft succulent 8 1/2” x 5 1/2” Score at 4 1/4” Layer #1 Basic white  4 1/8” x 5 3/8” Layer #2 2021-23 In-color DSP  (Soft succulent) 4” x 5 1/4” Focal point Basic white 5” x 2 1/2” and 4” x 5 1/4” (inside panel) Scraps of Basic black and Basic white for sentiment die cuts Amazing Silhouettes Stamp set Amazing Thanks dies Soft Succulent ink Brushed brass butterflies Glue layers 1 and 2 onto card base Stamp tree onto white focal point piece. Use dimensionals to adhere to left side of card front, leaving an even boarder on three sides.  Die cut “Thanks”  background in black and script in white Glue two pieces together.  Use glue to attach on left side and dimensionals on right side — over the focal piece.  Stamp butterfly on bottom right side of inside panel.  Adhere to inside of card.  Add butterflies to tree image.  Card #2 Card base - Thick Basic white 8 1/2” x 5 1/2”       Scored at 4 1/4” Layer #1 Rainbows and Sunshine DSP - Striped pattern       1/2” x 5 1/4” Bas