Amazing Silhouettes
Card #1
Card base - Soft succulent 8 1/2” x 5 1/2”
Score at 4 1/4”
Layer #1
Basic white 4 1/8” x 5 3/8”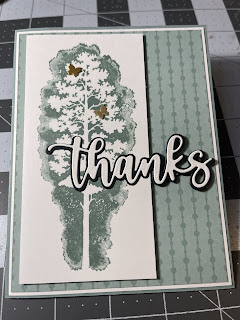

Layer #2
2021-23 In-color DSP (Soft succulent)
4” x 5 1/4”
Focal point
Basic white 5” x 2 1/2” and 4” x 5 1/4” (inside panel)
Scraps of Basic black and Basic white for sentiment die cuts
Amazing Silhouettes Stamp set
Amazing Thanks dies
Soft Succulent ink
Brushed brass butterflies
Glue layers 1 and 2 onto card base
Stamp tree onto white focal point piece. Use dimensionals to adhere to left side of card front, leaving an even boarder on three sides.
Die cut “Thanks” background in black and script in white
Glue two pieces together. Use glue to attach on left side and dimensionals on right side — over the focal piece.
Stamp butterfly on bottom right side of inside panel.
Adhere to inside of card.
Add butterflies to tree image.

Card #2
Card base - Thick Basic white 8 1/2” x 5 1/2”
Scored at 4 1/4”
Layer #1
Rainbows and Sunshine DSP - Striped pattern
1/2” x 5 1/4”
Basic white 5 1/4” x 3 3/4”
Amazing Silhouettes Stamp set
Saleabration Stamp set
Ink colors:
Daffodil Delight
Mango Melody
Polished Pink
Memento Black
Stamp the butterfly three times, once with each color.
Stamp sentiment in black on right side center
Glue the strip of DSP on left side leaving an even border on three sides.
Attach the white stamped piece with dimensionals. It will go over the edge of the striped piece.
Card #3

Scored at 4 1/4”
Layer #1
Crumb cake. 4” x 5 1/4” Emboss with Textured textiles folder and 4” x 5 1/4” for die cutting the word “Amazing” three times
Layer #2
Basic white 2 1/4” x 5”
Scraps of Basic white and Misty Moonlight for die cutting words “ You are amazing”
Amazing Silhouettes Stamp Set
Re-inkers:
Terracotta tile
Misty moonlight
Soft succulent
Pale papaya
Cinnamon cider
Baby wipe
Fold baby wipe in half. Add drops of re-inker in random pattern to area about the size of the tree stamp. Stamp tree image on Layer #2, using the baby wipes as the ink pad.
Die cuts:
3 ea “Amazing” in Crmb Cake (script)
1 ea “You are amazing” in Basic white (script)
1ea “You are amazing “ in Misty Moonlight (background)
Glue the embossed layer to card front.
Glue 3 crumb cake words starting at the bottom and moving up.
Use dimensionals to adhere Layer #2 to top left side of card front. All the way to the top edge, about 1” from left edge.
Glue white script words onto Misty Moonlight background pieces. Adhere to card front using a combination of liquid glue and dimensionals.


Comments