Friendly Hello
- Friendly Hello Sale-a-bration Stamp set and coordinating DSP
- Everyday Label punch
- Layering Circle dies
- Iridescent
- Blender pens in Fresh Fresia, Pool Party, and Daffodil Delight
- Wink of Stella
- Pool Party Sheer ribbon
Card 1
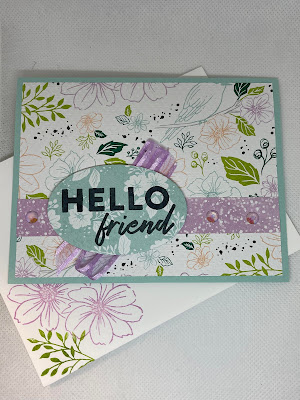
Card base - Pool Party card stock 5 1/2" x 8 1/2" Scored at 4 1/4"
Layer 1 - Friendly Hello DSP 4" x 5 1/4" (Pattern1)
Layer 2 - 3/4" x 5 1/4" (Pattern 2)
Layer 3 - Die cut oval about 2 3/4" wide (Pattern 3)
Layer 4 - 4" x 5 1/4" (inside panel)
Envelope - DSP Pattern 1 2 1/4" x 6"
Fresh Fresia Open Weave ribbon
Tasteful Textures embossing folder
Assembly:
1. Fold card base and burnish with bone folder.
2. Emboss Layer 1 with Tasteful Textures folder.
3. Adhere 3/4" Layer 2 horizontally to Layer 1, about 1" up from the bottom edge, then adhere the whole panel to the card front.
4. Stamp Sentiment on Layer 3 and die cut with Oval die.
5. Using Seal adhesive make a zig zag under the place where the sentiment oval will be placed. Be sure zig zag shows from behind the sentiment. Adhere sentiment piece with dimensionals.
6. Stamp inside layer and adhere.
7. Add Iridescent rhinestones along the 1/4" strip as they fit best.
8. Decorate envelope flap with 2 1/4" x 6" pieces of DSP and stamp front as desired.

Card 2

Card base - Basic Black card stock 4 1/4" x 11" Scored at 5 1/2" and cut off 2 3/4" from one end.
Layer 1 - Friendly Hello DSP 2 1/2" x 4" (Pattern 1)Layer 2 - Black piece cut off from card base (2 /34' x 4 1/4")Layer 3 - Basic White card stock 2 1/2" x 4"
Layer 4 - 2" square of DSP (Pattern 2)
Layer 5 - Basic white 4" x 5 1/4" (inside panel)
Envelope - DSP Pattern 1 2 1/4" x 6"
Assembly:
1. Fold and burnish card base. Short flap is the left front of card. Glue the Basic white panel to inside of card. Stamp as desired.2. Adhere DSP Layer 1 to front flap of card3. On Layer 3 Stamp and color the big flowers with Blends on bottom left. Stamp sentiment on top right --leaving enough space for the corner tuck piece. (Horizontally). Then adhere this piece to Layer 2 (black cut-off)4. Cut the 2 1/4" square diagonally. You will use one of the triangles to create the corner tuck piece, as shown in the picture. Use dimensional strips to adhere to corner of white card stock. Use dimensional to adhere to card front, making sure you only adhere to the short front flap of card.
5. Add wink of Stella to flowers.
6. Add Iridescent rhinestones.7. Decorate envelope as desired.

Card 3

Card base - Fresh Fresia card stock 5 1/2" x 8 1/2" Scored at 4 1/4"
Layer 1 - Friendly Hello DSP 4" x 4" (Pattern 1)
Layer 2 - Friendly Hello DSP 3 1/4" x 4" (Pattern 2)
Layer 4 - Basic white 4" x 5 1/4" (inside panel)
Layer 5 - 3/4" x 5 1/4" strip of DSP Pattern 1
Envelope - DSP Pattern 1 2 1/4" x 6"
Assembly:
2. Stamp over the flower image on DSP with Memento Black ink. You can also stamp over the leaf images using the large leaf stamp. Use the tiny branch stamp to stamp a few times around flower area using Evening Evergreen ink. Color flowers with Blends and add Wink of Stella. Adhere to left side of card using dimensionals.
3. Stamp the birthday sentiment on Pool Party strip. Trim as needed and make a banner cut on left side. Use glue and dimensionals to add to card front.
6. Add a large Iridescent rhinestone to the center of each flower.

Layer 3 - Basic white card stock 3 1/4" x 4 1/4"
1. Fold and burnish card base. Glue 4 x 5 1/4" piece of DSP to card front.
3. Stamp the birthday sentiment on Pool Party strip. Trim as needed and make a banner cut on left side. Use glue and dimensionals to add to card front.
4. make a bow with Pool Party sheer ribbon and attach to card front using a mini glue dot.
5. Glue strip of DSP (Layer 5) to bottom of inside panel, about 1/8" from from edge. Stamp and color as desired and then glue to inside of card.6. Add a large Iridescent rhinestone to the center of each flower.
7. Decorate envelope as desired.
Card 4

Card base - Thick Basic White 5 1/2" x 8 1/2" Scored at 4 1/4"
Layer 1 - Friendly Hello DSP 4" x 5 1/4"
Layer 2 - Basic Black card stock 3 3/8" x 4 3/8"
Layer 4 - 1/2" x 5 1/2" strip of matching DSP for inside
Layer 5 - 2 1/2" square of Basic black for die cutting frame
Layer 6 1 1/2" x 3" Pool Party for stamping and punching sentiment
Envelope - DSP 2 1/4" x 6"
Assembly:
2. Using two layering circles, die cut at same time to make a circle frame. Be sure your dies don't overlap. Use washy tape to secure in place.
3. Stamp the large flowers image on Layer 3. Fill surface with flowers, turning the stamp each time. Glue to black panel (Layer 2). Use the smaller circle die, that you used for make frame to cut out a circle frame, to cut out a circle from the stamped piece and black mat. Make hole toward the top. You will not need the black circle for this card.
3. Stamp the large flowers image on Layer 3. Fill surface with flowers, turning the stamp each time. Glue to black panel (Layer 2). Use the smaller circle die, that you used for make frame to cut out a circle frame, to cut out a circle from the stamped piece and black mat. Make hole toward the top. You will not need the black circle for this card.
4. Color flowers in die cut circle with blends. This piece will be used to create the Spotlight.
5. Adhere the stamped piece to the center of the card using dimemsionals and glue in the colored circle, making sure to line up the flowers. This layer will be lower. Glue the back circle frame around opening. This will help highlight the "Spotlight."6. Stamp the sentiment on pool party (Layer 6) and punch out with Everyday Label punch. Leave the sentiment towards the left edge. Once punched, use a piece of Post-it note to insert the punched piece back into punch, this will allow you to punch off the excess and shorten the shape of the punch.
7. Sprinkle Iridescent rhinestones.
7. Sprinkle Iridescent rhinestones.
8. Glue the 1/2" strip of Dip to right side of the inside of the card to decorate.
9. Decorate envelope as desired.


Comments